The field guide
Screen recording voiceover audio: the recording-side guide
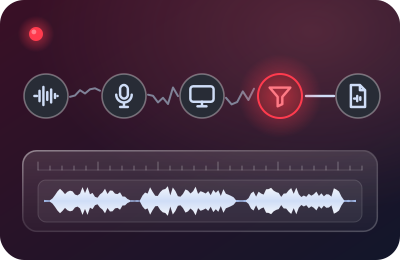
Everything between your mouth and the file, in the order it happens. This is the page we'd hand any screencaster or course creator on day one: not how to rescue bad narration in an editor, but how to record narration that never needs rescuing.
Vendor features, prices and limits on this page were verified against live vendor documentation on 20 September 2026. Recorders change; check the linked docs before you rely on a detail.
Why the recording side is the whole game
A screencast voiceover has a property most audio doesn't: it gets revised. Software UIs change, lessons get updated, one chapter gets re-cut into three. Whatever you baked into the original capture — fan hiss, a hot air-conditioner hum, clipped consonants — travels through every future revision, and every cleanup pass you apply on top gets re-applied and re-encoded with it. Audio you fixed in post is audio you'll be fixing forever.
The recording side inverts that economy. A quiet capture costs you ten minutes of setup once. It then pays out on every export, every re-edit, every platform re-upload, for the life of the course. That's the deal this guide is selling, and it's the only thing it's selling.
The signal chain, mouth to file
Every screencast voiceover passes through the same five stations. Trouble at any station flows downstream and cannot be fully undone at the next one:
- Voice in a room
- Mic + input gain
- OS input path
- Live suppressionoptional
- Recorder + fileyour master
Trouble at any station flows downstream; whatever reaches station five is the master every future edit starts from.
- Your voice in a room. The room adds reflection and background sound before any software exists. We're a software desk, so we'll say this once and move on: record in the softest, smallest space you reasonably can, and face away from windows and machines. Room-treatment advice beyond that is out of our lane.
- The microphone and its input gain. Whatever mic you own — we don't do hardware opinions — its input level decides whether your voice arrives strong over the noise floor or drowned next to it. This is the highest-leverage setting on this page.
- The operating system's input path. The OS picks a default device, a sample rate, and sometimes its own "enhancement" processing. Recorders inherit whatever mess lives here.
- An optional live suppression layer. Software like Krisp sits between the OS input and every app, removing background noise from the stream itself, so any recorder downstream captures the cleaned signal. OBS builds this station into the recorder as a filter.
- The recorder and its file. Loom, Camtasia, ScreenFlow, OBS — each captures the arriving stream with its own behavior: some record it raw, some process on playback, only some process live. What lands here is your master. Everything after is cleanup.
Station two: set levels like it's the last chance to — because it is
Two failures are genuinely unrecoverable in software: clipping (gain so hot the waveform hits the ceiling and distorts) and starvation (voice recorded so quietly that boosting it later boosts the noise floor just as much). Both are prevented in thirty seconds:
- Open your recorder's input meter, talk at your actual narration volume — not your "testing, testing" volume, which everyone unconsciously performs louder — and read the peaks.
- Set gain so speech peaks land roughly between -12 dB and -6 dB, never touching 0. Course platforms flag distortion explicitly in review; gain-too-high static is one of the most common rejection causes.
- Record a ten-second test, play it back over headphones, and listen for two things: is the voice comfortably above the room, and is anything crackling on plosives?
- Starvation — too quiet; boosting it later lifts the noise floor with it
- −12 to −6 dB — where speech peaks should land
- 0 dB — the ceiling; peaks never touch it, because a clipped take stays clipped
Meter diagram: speech peaks belong between minus 12 and minus 6 dB; quieter than that is starvation, and 0 dB is the clipping ceiling.
If you use a suppression layer, set levels with it running — suppression changes what the meter sees. And re-check levels at the start of every session, not every take; devices and OS updates love to reset input gain overnight.
Station four and five: what the big recorders actually do to your voice
This table is the recording-side truth as of our verification date. The pattern that surprises people: of the four standard screencast recorders, only OBS removes noise while you record. The others either capture raw or process after the fact.
- LoomPlayback only
- CamtasiaNone during capture
- ScreenFlowNone during capture
- OBS StudioLive, built in
- KrispLive, under any recorder
Summarised from the table below (vendor docs, verified 20 September 2026). Krisp is a layer under a recorder, not a recorder.
| Recorder | Noise handling while recording | What that means for your workflow |
|---|---|---|
| Loom | None during capture. A "Noise filter" toggle applies suppression to playback after recording, and can be set as a default. Loom's docs state downloaded videos include the original audio. | Fine if your Looms live and die in the web player. If you download MP4s for editing, treat Loom as a raw recorder and clean the stream before it. Full Loom plan → |
| Camtasia | None during capture — the mic is recorded as-is. TechSmith's noise tools (an AI "Remove Noise" audio effect) live on the editing timeline, applied after recording. | Feed it a clean signal and keep narration on its own track; the timeline effect becomes an emergency tool, not a routine. Camtasia workflow → |
| ScreenFlow | None during capture. Narration is captured to its own track; noise-reduction filters exist in the editor, post-recording. | Same rule as Camtasia, on the Mac side: the separate audio track is your safety net, not a license to record dirty. ScreenFlow session → |
| OBS Studio | Yes — live. The built-in Noise Suppression filter (RNNoise or Speex methods) processes your mic while recording; what hits the file is already suppressed. Free and open source. | The only recorder here where the recording-side philosophy is a checkbox. Worth learning even if you publish from another tool. OBS for screencasts → |
| Krisp (layer, not a recorder) | Yes — live, under any recorder above. Sits between mic and apps as a virtual device; every recorder captures the cleaned stream. | The way to give Loom, Camtasia and ScreenFlow the live suppression they lack natively. Where it fits → |
The honest caveats
Live suppression is not magic. It can soften consonants at aggressive settings, it does nothing about reverb (a room problem, not a noise problem), and it cannot un-clip a hot signal. It removes steady and intermittent background noise — fans, hum, traffic, keyboard — from an otherwise well-levelled voice. That's the job, and it's enough.
The Krisp question, priced honestly
Krisp is the default way to put live suppression under recorders that don't have it. As of 20 September 2026: the pricing page leads with a 7-day free trial (no credit card) and a Core plan at $8/month billed annually or $16 month-to-month. A free tier — 60 minutes of noise removal per day, resetting at midnight GMT — still exists, but you'll only find it documented in Krisp's help center these days, not on the pricing page, so treat it as a quiet legacy perk rather than a promise. Sixty daily minutes is genuinely enough to narrate a lesson a day; it is not enough for a batch-recording weekend.
The desk's default setup
For narration into Loom, Camtasia or ScreenFlow, we run Krisp underneath the recorder and forget it's there: the file arrives clean, every take, in every app. Try it against your own room's noise during the trial week and listen to the before/after yourself.
Marked on the slate as paid: start a Krisp plan from this button and Krisp pays the desk a commission for the referral. You pay krisp.ai’s own list price, not a cent more. It never changes what we report. Prices verified 20 September 2026.
The no-commission route: record in OBS and enable its built-in Noise Suppression filter (RNNoise). It's free, open source, pays us nothing, and for a quiet-ish room it gets you most of the way. The trade is OBS's learning curve and a less integrated editing story — our screencast-specific OBS setup keeps it minimal.
Room tone: the two free minutes that save every edit
Before you stop the recorder, sit silent for thirty seconds and let it capture your room doing nothing. That's room tone, and it's what your editor (even if that's you, next Tuesday) will slide under cuts, pauses and re-phrased sentences so the "silence" between words matches the silence inside them. Skip it, and every edit point becomes a tiny audible seam — the background noise cuts to digital zero and back. It is the single highest-return habit in this craft and it costs nothing. The full room-tone method is here, including the suppression-era wrinkle: record your tone through the same chain as your voice, or it won't match.
One pass, not five: the retake-free mindset
Clean audio isn't only a signal problem — it's a performance problem. Retakes are where screencast narration goes to die: take four has flatter energy, a drier mouth, a different distance from the mic, and a different room (the heating kicked in). The recording-side discipline extends to how you narrate: script marks that let you punch in mid-take instead of restarting, a slate at the head of every attempt, and the confidence to ship take one. The one-pass method is the desk's signature workflow; the notebook entry on take decay explains why it works.
Know what "good enough" is before you chase better
Course platforms publish audio expectations, and they are humbler than audio forums suggest: audio from both stereo channels, in sync with the video, free of distracting background noise, and undistorted. No platform asks for studio silence — they ask for unnoticeable audio. Our standards page translates the review checklists into recording-side targets, so you know when to stop tweaking and start teaching.
The short version
- Decide noise at the recorder, not the editor: OBS's filter or a Krisp-style layer under Loom/Camtasia/ScreenFlow.
- Set speech peaks to −12…−6 dB at your real narration volume, with the suppression layer running, every session.
- Ten-second test take, headphone playback, before every session — not after it.
- Thirty seconds of room tone through the same chain, every session.
- Mark your script for punch-ins; protect take one's energy.
- Stop at "unnoticeable" — that's what platforms actually check for.
Run the whole thing as a ritual with our ninety-second pre-REC checklist.
Questions we keep getting
- Should I remove noise while recording or after?
- Before the file, whenever you can. Live suppression protects the master; editor cleanup processes audio that already contains the problem and must be repeated on every revision. Our decision page covers the exceptions — yes, there are real ones.
- Does Loom remove background noise while recording?
- No — its Noise filter applies on playback, after recording, and Loom's own docs say downloaded videos keep the original audio. Details on the Loom page.
- What level should my voice peak at?
- Roughly −12 to −6 dB on the recorder's meter, never touching 0. Distorted (too-hot) audio is a stated review problem on course platforms and is unfixable in software.
- Is room tone still worth it if I use noise suppression?
- Yes — it's for edit continuity, not noise level. Suppressed "silence" has its own texture; capture thirty seconds of it so your cuts breathe like the take does.